はじめに
最近Ubuntuを使用して開発することが増えたので、 自分はウィンドウマネージャーは標準のGNOMEよりキーボードでデスクトップの管理がしやすい i3wm を使用します。
実際にセットアップ
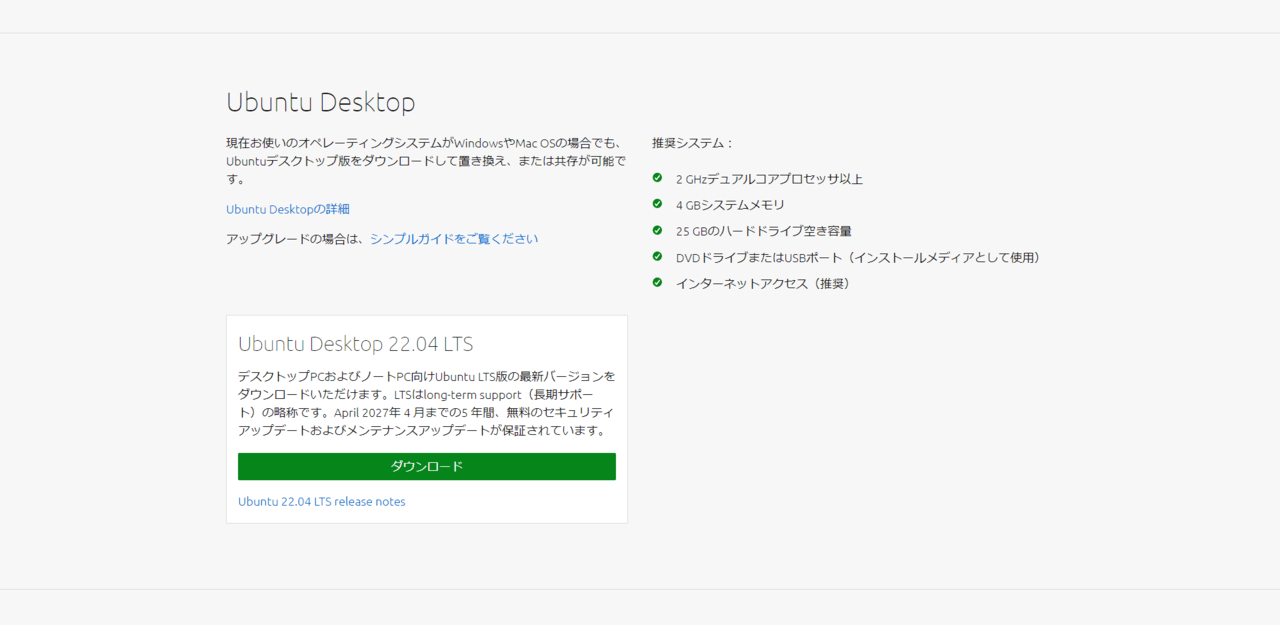
Ubuntu 22.04 のインストール
Ubuntuを入手する | Ubuntu | UbuntuからUbuntuをインストールします。
インストール作業は割愛。
自分はWindows 10をインストールしたPCにSSDを増設して、増設したSSDにUbuntuをインストールしてデュアルブート構成にしました。
インストール時は Windowsがインストールされているディスクは接続しないようにしておくことでWindows Boot ManagerとGRUBが干渉しないようにしました。
経験上この方法が安全だと思っている。
タイムセールで税込 3,770 円でした。

i3wm
i3 Window Managerをインストールします。
sudo apt install i3
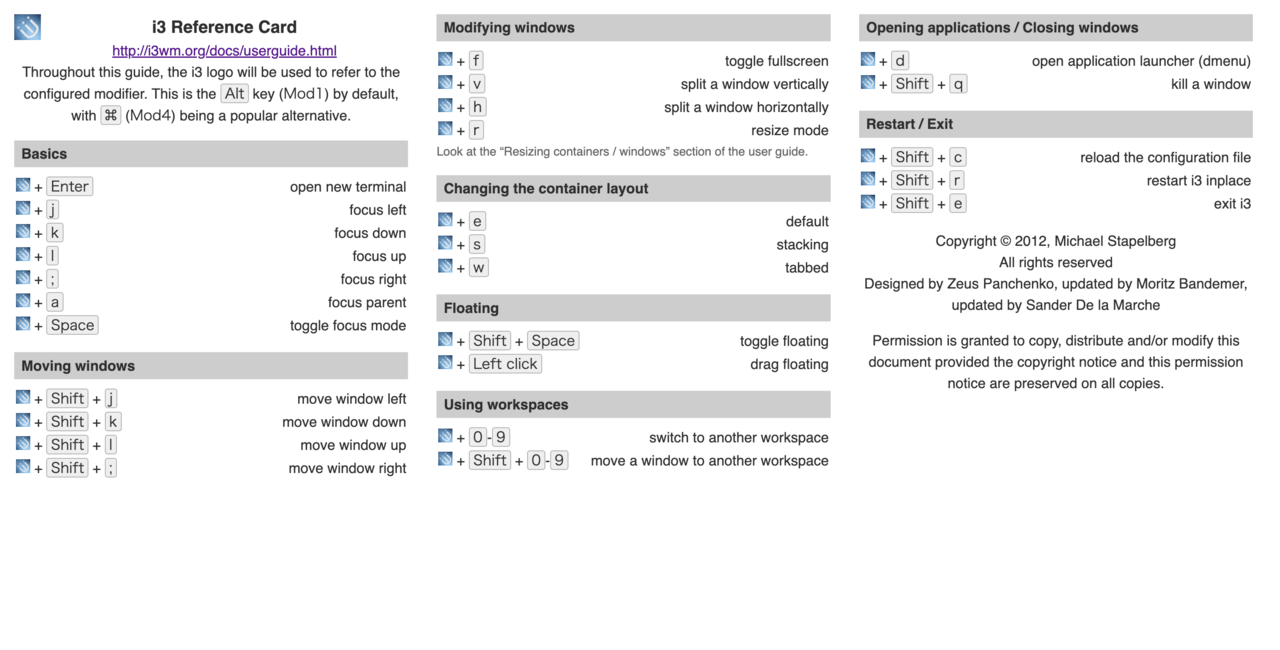
最初慣れないうちは、i3 Reference Cardをブックマークにしておくととても便利です。
VSCode
開発エディタとして使用する VSCode をインストールします。
設定ファイルはVSCodeを使って編集しています。
sudo snap install code --classic
fcitx-mozc
日本語入力を利用するため、fcitx-mozcを使用できるようにします。
まずはインストール。
sudo apt install fcitx-mozc
インストール後、 ~/.profile に入力方法を設定する環境変数を設定します。
export DefaultImModule=fcitx
export GTK_IM_MODULE=fcitx
export QT_IM_MODULE=fcitx
export XMODIFIERS="@im=fcitx"
i3 の設定ファイル ~/.config/i3/config に起動時に fcitx を利用するために以下の設定を追加します。
echo "exec --no-startup-id fcitx" >> ~/.config/i3/config
再ログインしてもいいですが面倒なのでリロードします。
Win(or Alt or Command) + Shift + R キーを同時押しすることでi3を再起動して設定を再読み込みさせます。
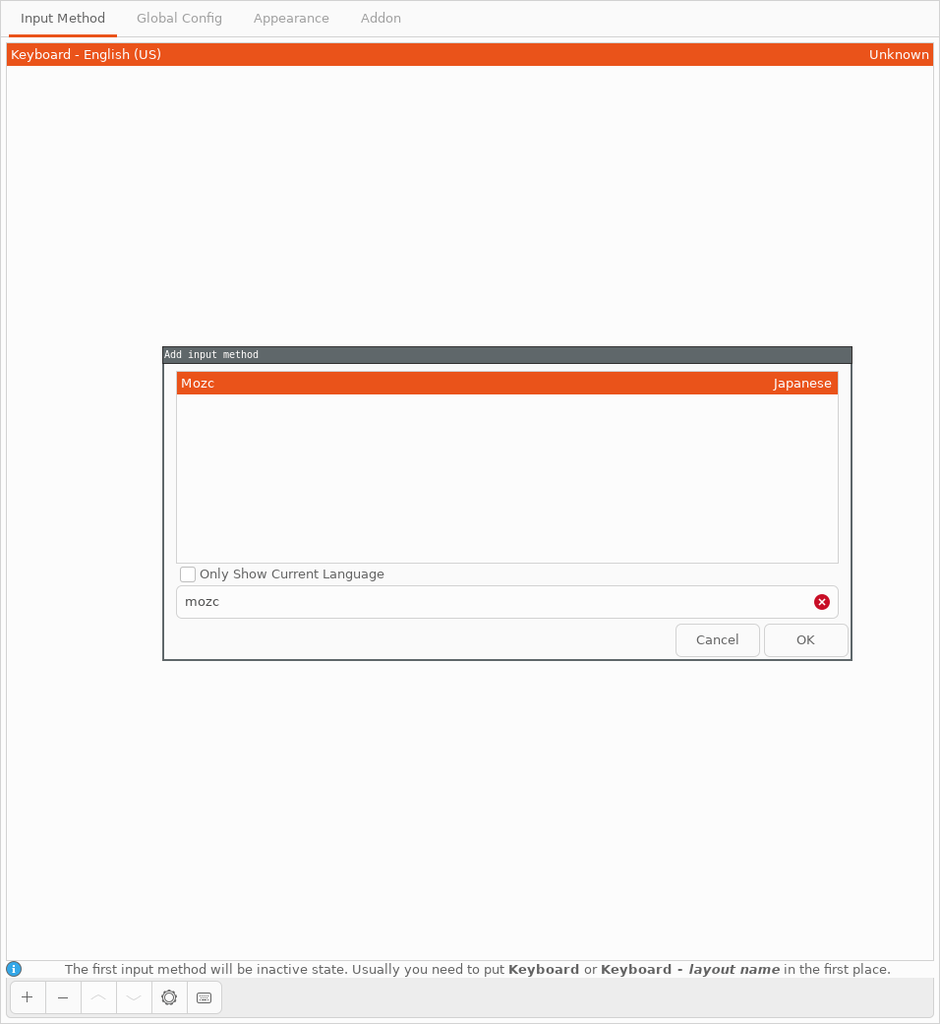
リロード後、以下のコマンドでキーボードの設定をします。
fcitx-config-gtk3
左下の + ボタンから add input method の画面を開き Mozc を検索して OK を押します。
自分は英字配列の HHKB を利用しています。
右Altキーで日本語と英語を切り替えたいので、 Global Config -> Hotkey -> Trigger Input Method を選択して Ralt に変更しておきます。

これで設定はOK
scrot
スクリーンショット撮影用に scrot をインストールします。
sudo apt install scrot
スクリーンショット撮影のたびに、全画面撮影の scrot や scrot -s を実行してもよいのですが、ショートカットで呼び出せるようにします。
以下を ~/.config/i3/config に追記します。
bindsym --release Mod1+Shift+1 exec sh ~/.config/scrot/screenshot_window1.sh
bindsym --release Mod1+Shift+2 exec sh ~/.config/scrot/screenshot_window2.sh
bindsym --release Mod1+Shift+3 exec scrot -u
bindsym --release Mod1+Shift+4 exec scrot -s
自分の場合はフルHDのデュアルディスプレイ環境なので、それぞれのディスプレイをキャプチャできるようにしています。
~/.config/scrot/screenshot_window1.sh
#!/bin/sh
scrot -a "0,0,1920,1080" -p
~/.config/scrot/screenshot_window2.sh
#!/bin/sh
scrot -a "1920,0,1920,1080" -p
feh + 壁紙
壁紙は feh を利用して設定します。
sudo apt install feh
壁紙は Big Sur Wallpaper 4K, Mountains, Daylight, Blue Sky, macOS , Stock, Nature, #1476 からダウンロードして使用しています。
ダウンロードした壁紙は ~/Pictures/Wallpapers フォルダに格納しておきます。(Wallpapers フォルダはないので mkdir などで作成しておく)
あとは設定したい壁紙を ~/.config/i3/config に追記して起動時に設定するようにします。
exec --no-startup-id feh --bg-fill ~/Pictures/Wallpapers/bigsur.jpg
Mac風のカーソル
ful1e5/apple_cursor を利用してカーソルをMac風にしておきます。
Releasesからダウンロードしたものを ~/.icons に macOSMonterey フォルダごと移動させて ~/.Xresources で設定します。
mkdir -p ~/.icons
mv ~/Downloads/macOSMonterey ~/.icons/
echo 'Xcursor.theme: macOSMonterey' >> ~/.Xresources
xrdb ~/.Xresources
i3lock (スクリーンロック)
デフォルトの i3lock ではなく、 Raymo111/i3lock-color を使っています。
bindsym Mod1+Ctrl+0 exec ~/.config/i3lock/i3lock.sh
設定はこんな感じ
#!/bin/sh

BLANK='#00000000'
OVERLAY='#00000033'
TEXT='#C5C8C6FF'
KEYINPUT='#79DE79CC'
WRONG='#FB6962CC'
VERIFYING='#A8E4EFCC'

i3lock \
--insidever-color=$OVERLAY   \
--ringver-color=$VERIFYING   \
\
--insidewrong-color=$OVERLAY \
--ringwrong-color=$WRONG     \
\
--inside-color=$BLANK        \
--ring-color=$TEXT        \
--line-color=$BLANK          \
--separator-color=$TEXT   \
\
--verif-color=$VERIFYING     \
--wrong-color=$WRONG         \
--time-color=$TEXT        \
--date-color=$TEXT        \
--layout-color=$TEXT      \
--keyhl-color=$KEYINPUT      \
--bshl-color=$KEYINPUT       \
\
--screen 1                   \
--blur 10                    \
--clock                      \
--indicator                  \
--time-str="%H:%M:%S"        \
--date-str="%Y-%m-%d"
terminator
デフォルトでは gnome-terminal が実行されますが、terminator を使用するようにします。
まずはインストールします。
sudo apt install terminator
インストール後、 ~/.config/i3/config に追記して起動時に設定するようにします。
bindsym $mod+Return exec terminator
MaterialDesign-Font
polybarで表示に使用するフォントをインストールします。
まずTemplarian/MaterialDesign-Fontをダウンロードします。
git clone https://github.com/Templarian/MaterialDesign-Font
ダウンロードしたファイルに .ttf ファイルが含まれるのでインストールします。
polybar
ステータスバーを polybar を使用してカスタマイズします。
まずはインストールします。
sudo apt install polybar
インストール後、Home · polybar/polybar Wiki を参考にしながら設定していきます。
まず起動スクリプトを準備します。
mkdir -p ~/.config/polybar
vim ~/.config/polybar/launch.sh
chmod +x ~/.config/polybar/launch.sh
起動スクリプトの中身はこんな感じにしています。
#!/usr/bin/env bash

# Terminate already running bar instances
# If all your bars have ipc enabled, you can use
polybar-msg cmd quit
# Otherwise you can use the nuclear option:
# killall -q polybar

# Launch bar1 and bar2
echo "---" | tee -a /tmp/polybar1.log
polybar mybar 2>&1 | tee -a /tmp/polybar1.log & disown

echo "Bars launched..."
~/.config/i3/config を設定して、起動時に polybar の起動スクリプトを実行するようにします。
exec_always --no-startup-id $HOME/.config/polybar/launch.sh
デフォルトでは、i3status を使用しているので、ついでにコメントアウトしておきます。
#bar {
#       position top
#        status_command i3status
#}
最後にpolybarの設定を ~/.config/polybar/config に用意しておきます。
いろいろ試行錯誤してこうなりました。
ここら辺はWikiを見ながら好みでカスタマイズしてもらうのが良いと思います。
;==========================================================
;
;
; ██████╗ ██████╗ ██╗ ██╗ ██╗██████╗ █████╗ ██████╗
; ██╔══██╗██╔═══██╗██║ ╚██╗ ██╔╝██╔══██╗██╔══██╗██╔══██╗
; ██████╔╝██║ ██║██║ ╚████╔╝ ██████╔╝███████║██████╔╝
; ██╔═══╝ ██║ ██║██║ ╚██╔╝ ██╔══██╗██╔══██║██╔══██╗
; ██║ ╚██████╔╝███████╗██║ ██████╔╝██║ ██║██║ ██║
; ╚═╝ ╚═════╝ ╚══════╝╚═╝ ╚═════╝ ╚═╝ ╚═╝╚═╝ ╚═╝
;
;
; To learn more about how to configure Polybar
; go to https://github.com/polybar/polybar
;
; The README contains a lot of information
;
;==========================================================
[colors]
background = #282A2E
background-alt = #373B41
foreground = #C5C8C6
primary = #79DE79
secondary = #A8E4EF
disabled = #707880
red = #FB6962
orange = #FFB347
yellow = #FCFC99
green = #79DE79
blue = #A8E4EF
[bar/mybar]
monitor = ${env:MONITOR:}
width = 100%
height = 20
radius = 0
; dpi = 96
background = ${colors.background}
foreground = ${colors.foreground}
line-size = 3pt
border-size = 3
border-color = #282A2E
; border-color = #00000000
padding-left = 0
padding-right = 1
module-margin = 3
separator = |
separator-foreground = ${colors.disabled}
font-0 = Noto Sans CJK JP:size=8;1
; https://github.com/Templarian/MaterialDesign-Font
font-1 = Material Design Icons Desktop:pixelsize=10;1
modules-left = xworkspaces
modules-center = xwindow
modules-right = pulseaudio cpu memory wlan eth date gnome-control powermenu
cursor-click = pointers
cursor-scroll = ns-resize
enable-ipc = true
tray-position = left
; Tray icon max size
tray-maxsize = 16
tray-background = ${colors.background}
tray-foreground = ${colors.foreground}
tray-offset-x = 0
tray-offset-y = 0
tray-padding = 0
tray-scale = 1.0
; wm-restack = generic
; wm-restack = bspwm
; wm-restack = i3
; override-redirect = true
[module/xworkspaces]
type = internal/xworkspaces
label-active = %name%
label-active-background = ${colors.background-alt}
label-active-underline= ${colors.primary}
label-active-padding = 3
label-occupied = %name%
label-occupied-padding = 3
label-urgent = %name%
label-urgent-background = ${colors.red}
label-urgent-padding = 3
label-empty = %name%
label-empty-foreground = ${colors.disabled}
label-empty-padding = 3
[module/xwindow]
type = internal/xwindow
label = %title:0:60:...%
[module/filesystem]
type = internal/fs
interval = 25
mount-0 = /
label-mounted = %{F#F0C674}%mountpoint%%{F-} %percentage_used%%
label-unmounted = %mountpoint% not mounted
label-unmounted-foreground = ${colors.disabled}
[module/pulseaudio]
type = internal/pulseaudio
format-volume = <ramp-volume> <label-volume>
label-volume = %percentage%%
label-volume-foreground = ${root.foreground}
label-muted =
label-muted-foreground = ${colors.red}
ramp-volume-0 =
ramp-volume-0-foreground = ${colors.orange}
ramp-volume-1 =
ramp-volume-1-foreground = ${colors.yellow}
ramp-volume-2 =
ramp-volume-2-foreground = ${colors.blue}
[module/xkeyboard]
type = internal/xkeyboard
blacklist-0 = num lock
format-prefix = " "
format-prefix-foreground = ${colors.foreground}
format-prefix-underline = ${colors.primary}
label-layout = %name%
label-layout-underline = ${colors.primary}
; label-indicator-padding = 2
; label-indicator-margin = 1
; label-indicator-background = ${colors.secondary}
; label-indicator-underline = ${colors.secondary}
[module/memory]
type = internal/memory
interval = 2
format = <ramp-used> <label>
ramp-used-0 =
ramp-used-0-foreground = ${colors.blue}
ramp-used-1 =
ramp-used-1-foreground = ${colors.green}
ramp-used-2 =
ramp-used-2-foreground = ${colors.yellow}
ramp-used-3 =
ramp-used-3-foreground = ${colors.orange}
ramp-used-4 =
ramp-used-4-foreground = ${colors.red}
label = %percentage_used%%
[module/cpu]
type = internal/cpu
interval = 2
format = <ramp-load> <label>
ramp-load-0 =
ramp-load-0-foreground = ${colors.blue}
ramp-load-1 =
ramp-load-1-foreground = ${colors.green}
ramp-load-2 =
ramp-load-2-foreground = ${colors.yellow}
ramp-load-3 =
ramp-load-3-foreground = ${colors.orange}
ramp-load-4 =
ramp-load-4-foreground = ${colors.red}
label = %percentage%%
[module/wlan]
type = internal/network
interface = wlp7s0
interface-type = wireless
interval = 1
format-connected = <ramp-signal> <label-connected>
label-connected = %essid% %downspeed:9%
format-disconnected = <label-disconnected>
label-disconnected =
label-disconnected-foreground = ${colors.red}
ramp-signal-0 =
ramp-signal-0-foreground = ${colors.red}
ramp-signal-1 =
ramp-signal-1-foreground = ${colors.orange}
ramp-signal-2 =
ramp-signal-2-foreground = ${colors.yellow}
ramp-signal-3 =
ramp-signal-3-foreground = ${colors.green}
ramp-signal-4 =
ramp-signal-4-foreground = ${colors.green}
[module/eth]
type = internal/network
interface = enp9s0
interface-type = wired
interval = 1
format-connected = <label-connected>
format-connected-prefix = " "
format-connected-prefix-foreground = ${colors.green}
label-connected = %local_ip% %downspeed:9%
format-disconnected = <label-disconnected>
label-disconnected =
label-disconnected-foreground = ${colors.red}
[module/bluetooth]
type = custom/script
exec = echo "%{F#98c379}"
exec-if = echo info | bluetoothctl | grep 'Device'
interval = 10
click-left = exec blueman-manager
click-right = exec blueman-manager
format-padding = 1
format-background = ${colors.green}
format-foreground = ${colors.green}
[module/date]
type = internal/date
interval = 1
date = " %Y-%m-%d"
; date-alt = " %d %a %b, %Y"
time = %H:%M:%S
; time-alt = %I:%M %p
format-prefix =
format-prefix-foreground = ${colors.foreground}
label = %date% %time%
[module/temperature]
type = internal/temperature
thermal-zone = 0
warn-temperature = 60
interval = 5
format = <ramp> <label>
format-warn = <ramp> <label-warn>
label = %temperature-c%
label-warn = %temperature-c%
label-warn-foreground = ${colors.secondary}
ramp-0 =
ramp-0-foreground = ${colors.blue}
ramp-1 =
ramp-1-foreground = ${colors.green}
ramp-2 =
ramp-2-foreground = ${colors.yellow}
ramp-3 =
ramp-3-foreground = ${colors.orange}
ramp-4 =
ramp-4-foreground = ${colors.red}
[module/powerbutton]
type = custom/text
content =
click-left = i3-msg exit
[module/gnome-control]
type = custom/text
content =
click-left = gnome-control-center
[module/powermenu]
type = custom/menu
expand-right = true
format-spacing = 1
; main label
label-open =
label-open-foreground = ${colors.foreground}
; main close
label-close = ""
label-close-foreground = ${colors.foreground}
label-separator = |
label-separator-foreground = ${colors.foreground}
; log out
menu-0-0 = ""
menu-0-0-exec = i3-msg exit
menu-0-0-foreground = ${colors.yellow}
; reboot
menu-0-1 = ""
menu-0-1-exec = reboot
menu-0-1-foreground = ${colors.orange}
; poweroff
menu-0-2 = ""
menu-0-2-exec = poweroff
menu-0-2-foreground = ${colors.red}
[settings]
screenchange-reload = true
pseudo-transparency = true
; vim:ft=dosini
ショートカット
ブラウザはよく使うのでショートカットを登録しておきます。
bindsym $mod+F2 exec google-chrome-stable
ウィンドウは google chromeのタブと同様に ホイールクリックで閉じるようにしておきます。
ここら辺は好みですね。
bindsym button2 kill
シャットダウンをカスタマイズ
デフォルトでは Win(or Alt or Command) + Shift + Q キーでサインアウトをするかどうか確認するバーが表示されます。
シャットダウンや再起動なども選べると便利なので、元の設定をコメントアウトして残しておきつつ選択肢を追加しておきます。
ぶっちゃけ polybar でバー上にボタンを設定しておけば使う必要はないです。
#bindsym $mod+Shift+e exec "i4-nagbar -t warning -m 'You pressed the exit shortcut. Do you really want to exit i3? This will end your X session.' -B 'Yes, exit i3' 'i3-msg exit'"
bindsym $mod+Shift+e exec --no-startup-id \
        "i3-nagbar -t warning -m 'Do you really want to exit i3?' -b 'Shutdown' 'systemctl poweroff' -b 'Reboot' 'systemctl reboot' -b 'Logout' 'i3-msg exit'"
ウィンドウのタイトルバーを消す
このgistを参考に設定しました。
# disable title bar
for_window [class="^.*"] border pixel 1
new_window 1pixel
ウィンドウとdmenuの色を統一
~/.config/i3/config を設定してウィンドウとdmenuの色を設定します。
色を設定する際にi3-configuratorはとても便利です。
# dmenu
bindsym $mod+d exec "dmenu_run -nf '#FFFFFF' -nb '#282A2E' -sb '#79DE79' -sf '#282A2E' -fn 'Noto Sans CJK JP-12' -p '>'"

# class                 border  bground text    indicator child_border
client.focused          #282A2E #282A2E #C5C8C6 #282A2E   #282A2E
client.focused_inactive #282A2E #282A2E #C5C8C6 #282A2E   #282A2E
client.unfocused        #282A2E #282A2E #C5C8C6 #282A2E   #282A2E
client.urgent           #282A2E #A54242 #FFFFFF #A54242   #A54242
client.placeholder      #282A2E #282A2E #C5C8C6 #282A2E   #282A2E

client.background       #282A2E
さいごに
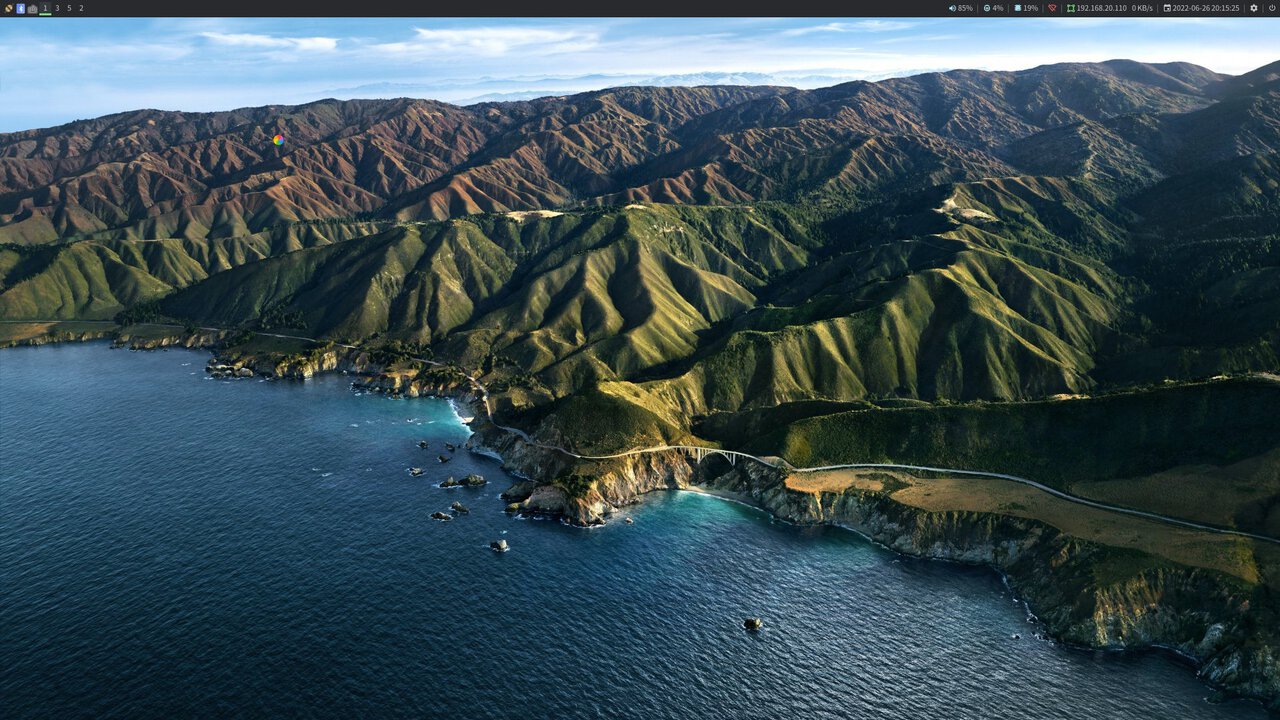
設定後のデスクトップはこんな感じです。
最終的な ~/.config/i3/config はこんな感じです。
# This file has been auto-generated by i3-config-wizard(1).
# It will not be overwritten, so edit it as you like.
#
# Should you change your keyboard layout some time, delete
# this file and re-run i3-config-wizard(1).
#

# i3 config file (v4)
#
# Please see https://i3wm.org/docs/userguide.html for a complete reference!

set $mod Mod4

# Font for window titles. Will also be used by the bar unless a different font
# is used in the bar {} block below.
font pango:monospace 8

# This font is widely installed, provides lots of unicode glyphs, right-to-left
# text rendering and scalability on retina/hidpi displays (thanks to pango).
#font pango:DejaVu Sans Mono 8

# Start XDG autostart .desktop files using dex. See also
# https://wiki.archlinux.org/index.php/XDG_Autostart
exec --no-startup-id dex --autostart --environment i3

# The combination of xss-lock, nm-applet and pactl is a popular choice, so
# they are included here as an example. Modify as you see fit.

# xss-lock grabs a logind suspend inhibit lock and will use i3lock to lock the
# screen before suspend. Use loginctl lock-session to lock your screen.
exec --no-startup-id xss-lock --transfer-sleep-lock -- i3lock --nofork

# NetworkManager is the most popular way to manage wireless networks on Linux,
# and nm-applet is a desktop environment-independent system tray GUI for it.
exec --no-startup-id nm-applet

# Use pactl to adjust volume in PulseAudio.
set $refresh_i3status killall -SIGUSR1 i3status
bindsym XF86AudioRaiseVolume exec --no-startup-id pactl set-sink-volume @DEFAULT_SINK@ +10% && $refresh_i3status
bindsym XF86AudioLowerVolume exec --no-startup-id pactl set-sink-volume @DEFAULT_SINK@ -10% && $refresh_i3status
bindsym XF86AudioMute exec --no-startup-id pactl set-sink-mute @DEFAULT_SINK@ toggle && $refresh_i3status
bindsym XF86AudioMicMute exec --no-startup-id pactl set-source-mute @DEFAULT_SOURCE@ toggle && $refresh_i3status

# Use Mouse+$mod to drag floating windows to their wanted position
floating_modifier $mod

# start a terminal
# bindsym $mod+Return exec i3-sensible-terminal
bindsym $mod+Return exec terminator

# kill focused window
bindsym $mod+Shift+q kill

# start dmenu (a program launcher)
#bindsym $mod+d exec --no-startup-id dmenu_run
# A more modern dmenu replacement is rofi:
# bindcode $mod+40 exec "rofi -modi drun,run -show drun"
# There also is i3-dmenu-desktop which only displays applications shipping a
# .desktop file. It is a wrapper around dmenu, so you need that installed.
# bindcode $mod+40 exec --no-startup-id i3-dmenu-desktop
# bindsym $mod+d exec --no-startup-id i3-dmenu-desktop
bindsym $mod+d exec "dmenu_run -nf '#FFFFFF' -nb '#282A2E' -sb '#79DE79' -sf '#282A2E' -fn 'Noto Sans CJK JP-12' -p '>'"

# change focus
bindsym $mod+j focus left
bindsym $mod+k focus down
bindsym $mod+l focus up
bindsym $mod+semicolon focus right

# alternatively, you can use the cursor keys:
bindsym $mod+Left focus left
bindsym $mod+Down focus down
bindsym $mod+Up focus up
bindsym $mod+Right focus right

# move focused window
bindsym $mod+Shift+j move left
bindsym $mod+Shift+k move down
bindsym $mod+Shift+l move up
bindsym $mod+Shift+semicolon move right

# alternatively, you can use the cursor keys:
bindsym $mod+Shift+Left move left
bindsym $mod+Shift+Down move down
bindsym $mod+Shift+Up move up
bindsym $mod+Shift+Right move right

# split in horizontal orientation
bindsym $mod+h split h

# split in vertical orientation
bindsym $mod+v split v

# enter fullscreen mode for the focused container
bindsym $mod+f fullscreen toggle

# change container layout (stacked, tabbed, toggle split)
bindsym $mod+s layout stacking
bindsym $mod+w layout tabbed
bindsym $mod+e layout toggle split

# toggle tiling / floating
bindsym $mod+Shift+space floating toggle

# change focus between tiling / floating windows
bindsym $mod+space focus mode_toggle

# focus the parent container
bindsym $mod+a focus parent

# focus the child container
#bindsym $mod+d focus child

# Define names for default workspaces for which we configure key bindings later on.
# We use variables to avoid repeating the names in multiple places.
set $ws1 "1"
set $ws2 "2"
set $ws3 "3"
set $ws4 "4"
set $ws5 "5"
set $ws6 "6"
set $ws7 "7"
set $ws8 "8"
set $ws9 "9"
set $ws10 "10"

# switch to workspace
bindsym $mod+1 workspace number $ws1
bindsym $mod+2 workspace number $ws2
bindsym $mod+3 workspace number $ws3
bindsym $mod+4 workspace number $ws4
bindsym $mod+5 workspace number $ws5
bindsym $mod+6 workspace number $ws6
bindsym $mod+7 workspace number $ws7
bindsym $mod+8 workspace number $ws8
bindsym $mod+9 workspace number $ws9
bindsym $mod+0 workspace number $ws10

# move focused container to workspace
bindsym $mod+Shift+1 move container to workspace number $ws1
bindsym $mod+Shift+2 move container to workspace number $ws2
bindsym $mod+Shift+3 move container to workspace number $ws3
bindsym $mod+Shift+4 move container to workspace number $ws4
bindsym $mod+Shift+5 move container to workspace number $ws5
bindsym $mod+Shift+6 move container to workspace number $ws6
bindsym $mod+Shift+7 move container to workspace number $ws7
bindsym $mod+Shift+8 move container to workspace number $ws8
bindsym $mod+Shift+9 move container to workspace number $ws9
bindsym $mod+Shift+0 move container to workspace number $ws10

# reload the configuration file
bindsym $mod+Shift+c reload
# restart i3 inplace (preserves your layout/session, can be used to upgrade i3)
bindsym $mod+Shift+r restart
# exit i3 (logs you out of your X session)
#bindsym $mod+Shift+e exec "i4-nagbar -t warning -m 'You pressed the exit shortcut. Do you really want to exit i3? This will end your X session.' -B 'Yes, exit i3' 'i3-msg exit'"
bindsym $mod+Shift+e exec --no-startup-id \
        "i3-nagbar -t warning -m 'Do you really want to exit i3?' -b 'Shutdown' 'systemctl poweroff' -b 'Reboot' 'systemctl reboot' -b 'Logout' 'i3-msg exit'"

# resize window (you can also use the mouse for that)
mode "resize" {
        # These bindings trigger as soon as you enter the resize mode

        # Pressing left will shrink the window’s width.
        # Pressing right will grow the window’s width.
        # Pressing up will shrink the window’s height.
        # Pressing down will grow the window’s height.
        bindsym j resize shrink width 10 px or 10 ppt
        bindsym k resize grow height 10 px or 10 ppt
        bindsym l resize shrink height 10 px or 10 ppt
        bindsym semicolon resize grow width 10 px or 10 ppt

        # same bindings, but for the arrow keys
        bindsym Left resize shrink width 10 px or 10 ppt
        bindsym Down resize grow height 10 px or 10 ppt
        bindsym Up resize shrink height 10 px or 10 ppt
        bindsym Right resize grow width 10 px or 10 ppt

        # back to normal: Enter or Escape or $mod+r
        bindsym Return mode "default"
        bindsym Escape mode "default"
        bindsym $mod+r mode "default"
}

bindsym $mod+r mode "resize"

# Start i3bar to display a workspace bar (plus the system information i3status
# finds out, if available)
#bar {
#	position top
#        status_command i3status
#}

# customized
bindsym button2 kill

exec --no-startup-id fcitx
# exec --no-startup-id nm-applet

# wallpaper
exec --no-startup-id feh --bg-fill ~/Pictures/Wallpapers/bigsur.jpg

# Polybar Launch script
exec_always --no-startup-id $HOME/.config/polybar/launch.sh

# disable title bar
for_window [class="^.*"] border pixel 1
new_window 1pixel

# class                 border  bground text    indicator child_border
client.focused          #282A2E #282A2E #C5C8C6 #282A2E   #282A2E
client.focused_inactive #282A2E #282A2E #C5C8C6 #282A2E   #282A2E
client.unfocused        #282A2E #282A2E #C5C8C6 #282A2E   #282A2E
client.urgent           #282A2E #A54242 #FFFFFF #A54242   #A54242
client.placeholder      #282A2E #282A2E #C5C8C6 #282A2E   #282A2E

client.background       #282A2E

# shortcut
bindsym $mod+F2 exec google-chrome-stable
bindsym --release Mod1+Shift+1 exec sh ~/.config/scrot/screenshot_window1.sh
bindsym --release Mod1+Shift+2 exec sh ~/.config/scrot/screenshot_window2.sh
bindsym --release Mod1+Shift+3 exec scrot -u
bindsym --release Mod1+Shift+4 exec scrot -s

# screenlock
bindsym Mod1+Ctrl+0 exec ~/.config/i3lock/i3lock.sh
なんだかんだ設定に1日くらいかかってしまいましたが、見た目を自分好みにチューニングできるのはなかなか楽しいです。